The hip escape — also called a shrimp — is the most important ground move you’ll learn in BJJ. Not a submission. Not a sweep. A movement that makes both of those possible by letting you shift your hips away from an opponent’s weight, recover your guard, and stay in the game when someone bigger has you flat.
It takes five steps: bridge, turn, shrimp, knee in. The whole sequence lasts two seconds. But getting it right — so it works under real pressure — takes deliberate drilling. Here’s exactly how to do it.
The first time you get pinned under someone who outweighs you by 20 kilos, the panic sets in. You push, bridge wildly, squirm. Nothing moves. Then your coach shows you the hip escape. You do it once correctly and you’re out. Not because you’re stronger — because you changed the angle.
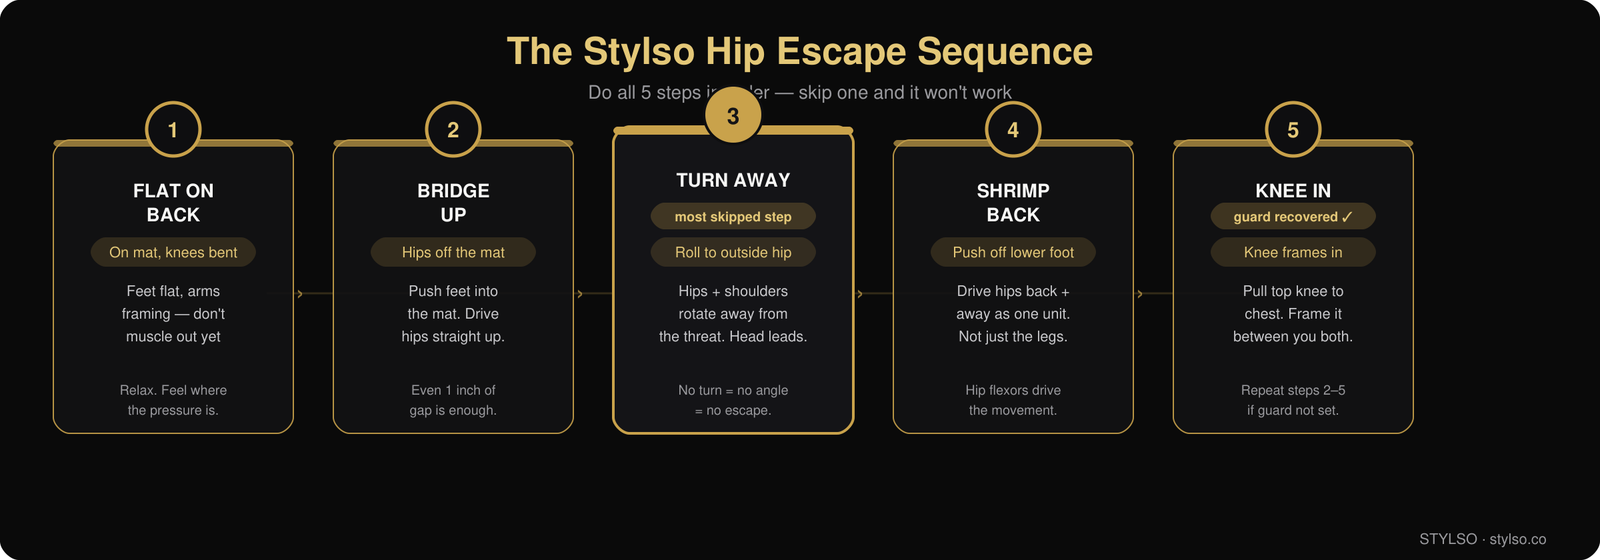
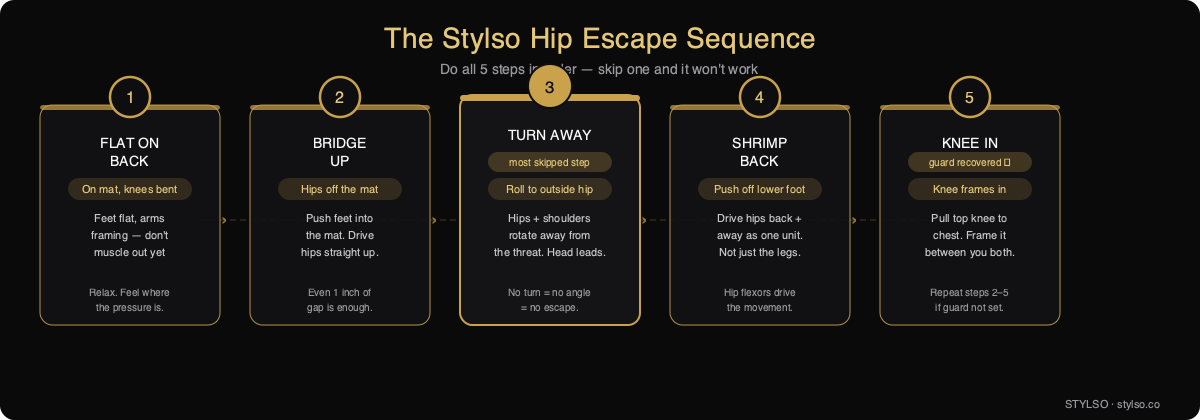
- The hip escape is five steps: flat on back → bridge → turn away → shrimp back → knee in. In that order every time.
- The Turn step (step 3) is the one beginners skip — and it’s why the shrimp fails without it.
- Drill it solo down the mat, 20 reps per side, three times a week. The reflex builds faster than any YouTube tutorial can teach.
What Is a Hip Escape?
A hip escape (shrimp, ginga) is a ground mobility skill that lets you shift your hips away from where someone’s controlling you. It’s how you recover closed guard when someone’s passing. It’s how you create space for sweeps and submissions from bottom. It’s the reason you can get out from under a 250-pound guy without matching their strength.
It’s not complicated. It’s mechanical — bridge to create a gap, turn to change the angle, shrimp to drive the hips back, knee in to close guard. Most coaches teach it on day one for a reason: without it, your bottom game is just survival mode.
How to Do a Hip Escape in BJJ (5 Steps)
- Flat on back. Lie back, knees bent, feet flat on the mat. Arms frame out in front of you — not pushing yet, just creating a light barrier. Imagine your opponent has side control. Relax. Don’t muscle against it immediately. Assess where the pressure is.
- Bridge up. Drive your feet into the mat and push your hips straight up. Don’t turn yet — just go up. You’re creating the initial gap. Even an inch is enough. This is why the bridge comes before the turn, not after.
- Turn away (the step everyone skips). At the top of the bridge, roll your hips and shoulders toward the side you’re escaping to — away from the threat. Turn your head the same direction. Your outside hip should point at the ceiling. No turn means no angle means the shrimp goes nowhere.
- Shrimp back. Push off your lower foot and drive your hips back and away — like a shrimp tail snap. Your whole lower body moves as one unit. Not just your feet sliding. Your hip flexors pull the whole complex. This is the movement. This is what takes drilling to get right.
- Knee in. As your hips drive back, pull your top knee toward your chest and frame it between you and your opponent. That knee is your guard. If they’re still too close, repeat steps 2–5 from here. It’s not a one-rep move — chain them down the mat until you have room.
Common Mistakes (and How to Fix Them)
Most beginners try to push their way out with their arms. It doesn’t work. Their arms are stronger than yours. The hip escape wins with angle and timing, not muscle. Here’s what actually goes wrong:
- Skipping the bridge. Shrimping flat, without the bridge first, gets you zero gap. You’re just sliding your feet while their weight sits fully on you. Bridge first. Always.
- Not turning. This is the big one. You bridge, go straight to the shrimp, and wonder why nothing happens. The turn changes your angle relative to their weight. No turn = no leverage = they settle right back down.
- Moving just your feet. Sliding your feet back while your hips stay put is not a hip escape. Your whole hip complex — both hips, the pelvis, the lower back — drives back as one unit. Feet are just the push-off point.
- Turning the wrong direction. Turn away from the side they’re controlling. If they’re in side control on your right, turn left. Turning toward them puts you directly into their base.
- One and done. In a real roll, one shrimp usually isn’t enough. Chain them. Bridge, turn, shrimp, knee in — then immediately repeat if guard isn’t set. Three shrimps in a row creates real distance.
How to Practice Hip Escapes Without a Partner
You don’t need a training partner to build this. The solo shrimp drill — across the mat and back — is how every BJJ player ingrains the pattern.
- Start at one end of your mat or a clear floor space.
- Lie flat on your back, knees bent, feet close to your hips.
- Execute the full 5-step sequence.
- You’ve moved a few feet down the mat. Reset and repeat.
- Do 20 reps each direction (right side, left side). Three sessions a week.
Ten minutes of solo shrimping, three times a week, builds the muscle memory faster than watching technique videos. It’s why every coach starts class with this — not because it looks good, but because it works. Pair this with the rest of the Stylso solo BJJ drills for a complete no-partner training session.
Related: after you have the hip escape, the next layer is using it in context — check the BJJ mount escape guide to see how it fits into escaping full mount.
The Cross-Discipline Connection
Wrestlers use a nearly identical movement when they shoot a double-leg and get stuffed — they hip switch and reset their angle to avoid getting guillotined or front-headlocked. The mechanics are the same: bridge, change the angle, drive the hips.
Judokas use hip mobility in ukemi (breakfalls) and in foot sweeps — the same hip-loading pattern transfers. If you’ve trained either sport, the movement pattern already lives in your muscle memory. You’re just applying it to guard recovery.
The off-mat carryover is real too. Hip flexor mobility — low lunges, figure-4 stretches, hip circles — directly improves the quality of the shrimp. Stiff hip flexors make the movement choppy and slow. Ten minutes of hip mobility on rest days makes the technique smoother on the mat. That’s a yoga/flexibility lesson that pays off directly in rolling.
The Right Gear for Daily Drilling
Hip escape drilling — especially the solo mat drill — puts real friction on your gi. The collar and lapels take the most wear as you turn, and the sleeve cuffs get stressed when you frame. A gi built for daily training handles this. One built for looks doesn’t.
The Stylso men’s gi is pearl-weave construction, pre-shrunk, IBJJF-approved, with reinforced collar and sleeve stitching. Verified customer reviews on Amazon confirm it holds up to regular drilling without thinning at the wear points. It’s what we’d recommend for anyone drilling technique multiple times a week.
Free: Hip Escape Drill Sheet
A printable one-page guide — the 5-step sequence, solo drill checklist, hip mobility moves, and a 4-week practice tracker. Get it instantly.
FAQ
- What is a hip escape in BJJ?
- A hip escape (also called a shrimp or ginga) is a ground mobility technique. You bridge your hips, turn to your side, and drive your hips away from an opponent to create space and recover guard. It’s the most fundamental movement in BJJ’s bottom game.
- How long does it take to learn the hip escape?
- The basic movement takes one class to understand. Making it work under real pressure — against a resisting partner — takes a few weeks of consistent solo drilling. Most white belts have a functional hip escape within 4–6 weeks of regular practice.
- Why doesn’t my hip escape work?
- Usually one of three things: you’re skipping the bridge (step 2), you’re skipping the turn (step 3), or you’re moving only your feet instead of your whole hip complex. Try isolating step 3 in your solo drill — turn completely before you shrimp — and most people see immediate improvement.
- Can I practice hip escapes at home without a partner?
- Yes. The solo shrimp drill — lying on your back and shrimping down the length of a mat or clear floor — is one of the best ways to build the pattern. Twenty reps per side, three times a week, builds the reflex you need for live rolling.
- Is the hip escape the same as shrimping?
- Yes. “Shrimping,” “hip escape,” and “ginga” all describe the same movement. The name varies by gym, coach lineage, and country. The technique — bridge, turn, drive hips back, knee in — is identical.