Iron-ons peel off a BJJ gi in weeks. The weave is thick, bumpy cotton — not the flat fabric iron-on adhesive is built for. Sew patches on instead. A whipstitch around every edge holds through hundreds of sessions and washes. Takes 10 minutes per patch. Here’s how to do it, plus IBJJF placement rules if you compete.
- Sew, don’t iron — iron-on adhesive can’t grip thick gi cotton and lifts after a few washes.
- Whipstitch every edge — corners, sides, and back. Not just a few tacks through the middle.
- Check IBJJF placement zones — where a patch sits matters as much as how it’s attached, if you compete.
Why Iron-On Patches Won’t Survive BJJ Training
Picture this: you’ve ironed a sponsor patch onto your competition gi. It looks perfect. Then you hit three rolls, get covered in sweat, and your training partner grabs your lapel so hard it stretches the whole jacket. By the time you wash it, the corner of that patch is already lifting.
That’s not a cheap-patch problem. It’s a physics problem.
Iron-on adhesive bonds to smooth, flat fabric — think dress shirts or cotton T-shirts. A BJJ gi jacket is woven from heavy pearl weave or double weave (often 450 gsm or more). The surface is textured and bumpy, the fibres are thick, and heat from training breaks down adhesive far faster than a normal wear environment. The bond was never going to last.
In judo, this problem was solved decades ago: you sew patches on. Judo players stitch club and national federation patches onto heavyweight cotton gis with a hand-sewn whipstitch. The thread passes through the fabric itself — no adhesive, no surface bond, nothing to peel. BJJ borrowed the gi from judo. It’s worth borrowing the patch technique too.
What You’ll Need
- Sharp hand-sewing needle — thick enough to push through gi fabric without bending, sharp enough not to snag the weave.
- Polyester thread — stronger than cotton thread under repeated washing and physical stress. Match the colour to the patch border or the gi colour.
- Chalk or a fabric marker — to mark patch position before you commit. Washable chalk works fine.
- Scissors — to trim thread ends cleanly after each knot.
- Straight pins or basting thread (optional) — useful for holding the patch flat while you stitch. Worth it for larger patches.
No sewing machine needed. A hand-sewn whipstitch is the standard, and it’s stronger on heavy cotton than most machine stitches anyway — the tension stays even.
How to Sew a Patch onto Your BJJ Gi
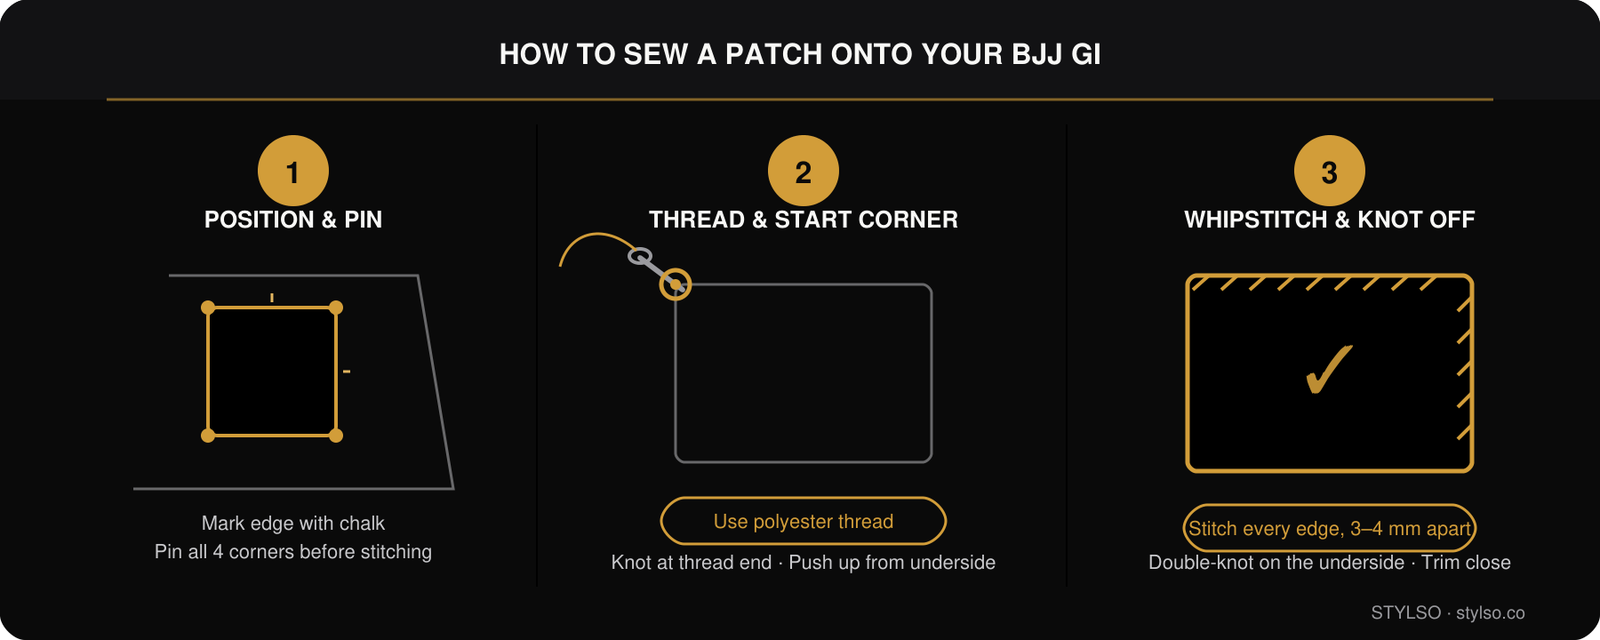
- Position, mark, and pin. Place the patch exactly where you want it on the gi jacket. Use chalk or a fabric marker to trace lightly around the edge. Pin or baste the patch down so it can’t shift while you work. Double-check placement against the IBJJF zones if this gi is for competition — see the section below. Wash your gi first if it’s new (let it pre-shrink so the patch position doesn’t drift after the first laundry).
- Thread the needle and start at a corner. Cut about 40 cm (16 in.) of polyester thread. Thread the needle and tie a small, tight knot at the end. Push the needle up through the gi fabric from the underside, right at one corner of the patch, so the knot catches under the gi. Start at a corner — that’s where patches lift first, and anchoring there matters.
- Whipstitch around every edge, then knot off. Work around the perimeter with small, even stitches — about 3–4 mm (⅛ in.) apart. Each stitch goes down through the patch edge and the gi fabric below it, then up again, creating a diagonal wrap around the border. Keep your tension even: tight enough to hold, not so tight it puckers the gi. Sew all four sides completely. When you return to the starting corner, push the needle back through to the underside and tie off with a double knot behind the fabric. Trim the thread close. Done.
The first patch takes 15 minutes. By the third, you’ll be done in 10. A patch sewn this way won’t come off — not from washing, not from hard rolling, not from a tournament referee giving it a tug.
Shop the Stylso Men’s Gi on Amazon
Patch Method Comparison
If you’re choosing between methods, here’s the honest breakdown.
| Method | Durability | Competition Legal | Time | Best For |
|---|---|---|---|---|
| Sew-On (whipstitch) | 🟢 Permanent | ✅ Yes | 10–15 min/patch | All gis, especially competition |
| Iron-On | 🔴 Peels in weeks | ⚠️ Risky (edges lift) | 5 min/patch | Display only — not for training gis |
| Hook-and-Loop (velcro) | 🟡 Moderate | ❌ No (scratches opponents) | 5 min/patch | Practice patches only |
| Fabric Glue | 🔴 Peels like iron-on | ⚠️ Risky | 5 min/patch | Temporary baste before sewing only |
The answer for any gi you train in or compete with: sew it on.
IBJJF Patch Placement Rules
Before you pick up the needle, check where your patch is going. IBJJF restricts placement zones on competition gis — patches in the wrong location can get you sent back to change before your match, and in some cases disqualified.
The allowed areas are the chest (below the lapel), sleeves, and back panel. There are size restrictions and zones that must stay clear — especially near the collar and certain seam areas. The full breakdown is in our BJJ Gi Patches Rules guide — read it before you sew anything onto a competition gi.
Make sure the gi itself passes inspection too. Our IBJJF Gi Requirements guide covers the full inspection checklist — weave, colour, fit, reinforcement points, and yes, patches.
One Real Trick: Break In the Gi First
Here’s something most patch guides skip. If the gi is brand new and stiff — “board-stiff” as grapplers say — the fabric hasn’t settled yet. Sew patches on a fresh, unwashed gi and two things happen: the fabric shifts slightly after the first wash, and the patch placement ends up slightly off. It’s subtle but noticeable if you care about the look.
The fix: break in the gi first. Wash it once (cold water, hang dry), wear it for a couple of sessions, let it settle. Then add patches. The fabric’s done its initial movement, and your placement stays accurate.
A practical health note too: if you’re sewing through heavy pearl weave by hand, it’ll work your fingers harder than you’d expect. Take short breaks between patches. A sewing thimble helps, or wrap your fingertip with a strip of sports tape before you start — it’s the same grip protection trick wrestlers use for their fingers.
Free: The Stylso Patch & Care Checklist
Sewing steps, IBJJF placement zones, patch tracker, and gi care tips — in a printable one-page PDF.
FAQ: Adding Patches to a BJJ Gi
Can I use fabric glue instead of sewing?
Only as a temporary hold while you sew. Fabric glue doesn’t penetrate thick gi cotton any better than iron-on adhesive does. It’ll peel. Use it to baste the patch in place before stitching, then sew it properly.
What thread colour should I use?
Match the thread to the patch border, not the gi. If the patch has a black border, use black thread — it disappears into the edge. If the patch is all gold, gold thread works. White thread on a dark patch border stands out and looks unfinished.
Do I need to wash my gi before adding patches?
Yes — especially if it’s new. Wash it once in cold water and hang dry it first so it goes through its initial pre-shrink. Otherwise the fabric shifts after the first laundry and your carefully centred patch ends up slightly off.
How many stitches per edge?
Aim for stitches about 3–4 mm apart. On a standard 5 cm × 5 cm patch, that’s roughly 12–15 stitches per side. Closer stitching means a more secure hold and a cleaner look. More than 4 mm apart and the patch edge can lift between stitches.
Can I add patches to a kids’ gi the same way?
Same technique, slightly finer needle. Kids’ gi fabric is usually lighter than adult gi weight, so a medium-weight needle works better than a heavy one. Check our best BJJ gi for kids guide for gis with reinforced fabric that handles patches well.
Is there a way to remove a sewn patch without damaging the gi?
Yes — a seam ripper. Work slowly from the inside of the gi, lifting each stitch one at a time. It takes 5–10 minutes and leaves the gi fabric intact if you’re careful. Avoid scissors near the gi surface; the seam ripper’s hook is designed for this job.
Shop the Stylso Men’s Gi on Amazon
Patching a kids’ gi? The Stylso Kids’ Gi on Amazon has reinforced stitching that holds patches clean through hard training.